Using Zapier’s Formatter step to streamline your automations
Mar 02 2021
It can be used to make your data uniform to remove any discrepancies in formats or even quantity of data. For example, just with names, you can make sure the first name will always house the “First Name” no matter which tool you choose to view.
Seeing as we work with plenty of ecommerce businesses, let’s explore some examples use cases in that context.
Want more automation resources sent to your inbox? Join our newsletter.
We all love ordering our favorite organic produce online!
We will start the first one for those who have poured all their passion into building their own online store on Shopify. You like to spend a lot of time focusing on actually creating the product for your customer. The orders are pouring in and you don’t really have time to spend on admin or have the cash for another intern. You manage your accounts Xero that help you manage your orders, prioritize, manage payments, generate the paperwork.
In this part of the exercise, we will build on automation that helps you easily generate invoices on Xero as soon as an order is placed on your Shopify website. Zapier offers easy automation that helps us pass the order information from Shopify to Xero.
However, an important part of the information is the Timestamp of the order. Shopify already stores this data for you in a certain format (here, YYYY-MM-DD-THH-MM-SS (+/- GMT) on its dashboard. This contains the time and date of the order. Xero on the other hand only needs the date part of this information to generate the invoice. Zapier formatter makes us easily translate the Shopify timestamp format to the Xero Format.
This is also similar to how we will set up our Zaps. Once you pass on the other details to Xero, it’s a matter of seconds before you can automate your invoice generation. So let’s get started!
Zapier works a bit like a flow diagram. You have it give input or [TRIGGER] to generate some output or [ACTION]. Here, we have one [TRIGGER], i.e. “Every time a new order is placed on the website” which will contain all the information about the order. And two [ACTION]s
1. Formatter (Convert Order Time Stamp to Invoice Date)
2. Xero (Generate Invoice for the Order Placed

So let’s set up the [TRIGGER] in Shopify. Here, we already have a set order on our Orders dashboard for a necklace whose ID is #1002.
Quick Tip: Ensure there is a consistency of Item ID across all your applications to ensure smooth flow of data and avoid duplicity of data.

Now, let’s jump to Zapier. Choose this zap to connect Shopify to Xero.

Select the [TRIGGER] event to “New Order”. Click on “Continue”.

You now need to connect your Shopify account. You will be redirected to a page to enter your website link.

Once you’re done connecting your Shopify account, go ahead and test your [TRIGGER]. It should display your latest order information. This confirms that the right account is linked to your automation.
I know we are excited to set up the process in Xero for invoice generation but let’s not forget about our Formatter. Before Xero can process the “Date” part of the information for the invoice, we have to convert the data from Shopify in a format that Xero understands. So our next [ACTION] will be firing up formatter.
Click on the “+” icon between Shopify and Xero on Zapier.
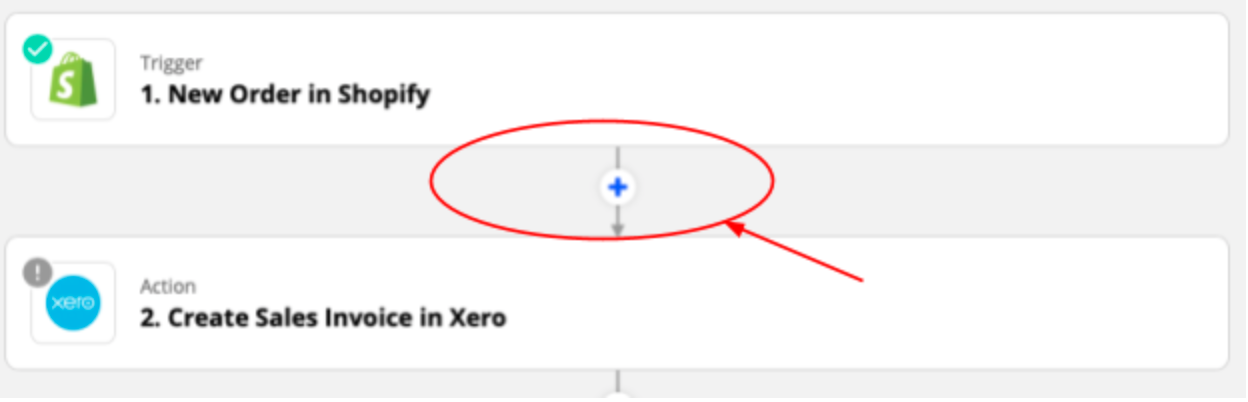
And select “Format”. In case you don’t find it in the right panel, you can also run a search in the “Apps” search bar.

Now let’s set up Formatter to change the Date format. The [ACTION] event for this step can be selected as Date/Time. This is to indicate the kind of input we will alter.
This is also an incredibly powerful step because it allows us to manipulate data in different ways between apps. An example would be rounding off your invoice amount, changing textual data, or even plugging in data from another data source altogether like excel, etc!
I know we got excited too! But for now, let’s just change the Date format.

You will see two kinds of transformations that you can perform. Select “Format” from the dropdown.

This will open up another set of fields to indicate the conversion of the Date format and fill in as per the details below.
a. Input Field: The Shopify field that contains the Date value. Here it is under the “Created at” field.
b. To Format: This is the format in which you want the date to be displayed on your invoice. Here it’s MMMM DDYY.
c. To Timezone: The invoice timezone. Here we selected US/Pacific.
d. From Format: The format is stored in Shopify.
e. From Timezone: The timezone you’re using in Shopify. Currently, it was GMT. You can also find this under the “Standards and Format” subsection under Settings in Shopify if you’re not sure.

Finally, you can test your [ACTION]. Here 2021-02-25T23:33:37+05:30 should display as February 25, 2021.
The last [ACTION] of this zap is now setting up all the information we have from Shopify and Formatter into fields that Xero needs. As usual, you have the link to your Xero account first. Simply plugin your Xero password and username. You will also be asked to give access to Zapier. Click “Allow Access” and you’re good to go!

You will now be directed to set up the fields required to create the invoice. These may look overwhelming, but let’s work through them one by one.
a. Organization: This is the company name in Xero. Here, it’s Acme Company
b. Contact Name: The customer name. We already have this information stored in Shopify. So go ahead and choose “New Order from Shopify” in the dropdown >> “Customer First Name” & “Customer Last Name” field
c. Email Address: Select the customer’s email address from the Shopify field.

d. Status: Indicates the status of the invoice in Xero. Select “Draft” here.
e. Date: This is where the Formatter finally comes in handy! By selecting “Date/Time” under Insert Data, we are communicating the zap to pick up the data from Zapier formatter. We need to now indicate the specific output field in Formatter. Here it is “Created At”

f. Currency: Currency in which you want to raise your invoice.
Now let’s set up the Item information we want to display in the invoice.
a. Line Items Type: This field has 3 options; Inclusive, Exclusive & Exempt. This allows you to display the price information with reference to taxation. We are selecting “Exclusive” here or the base price of the item. Xero will automatically apply the necessary tax on this value as per the item/tax rules of your country.
b. Item Code: This is the item code field in Shopify. You may often run into errors on your zap in case your item code on the website does not match the item codes loaded in Xero.

c. Quantity: Shopify field to indicate the quantity of the item
d. Unit Price: Shopify field to indicate the unit price of the item. Here its “Line Item Price”
e. Account: Select “Sales”
f. Tax Rate: Select “Tax on Sales”
And you’re set! Test the [ACTION]. You should see an invoice in your Xero account!

You can also pass on other data from Shopify in different forms to Xero to be displayed in your invoice. All you have to set up more Formatter zaps processing different kinds of data in separate steps.
This would save you hours while also maintaining seamless consistency of data across all your tools. You can also check out CRM integrations in case you would also like to track your inventories too!
Maximizing ROI for your customer
Facebook and Google campaigns can be a very critical level for finding more customers that can benefit from your services. Very often we find them, but do little to re-engage them. For instance, a graduate who may have bought a Coursera course from you may also find value in joining a community of other graduates. The key is to focus deeply on your persona and understand their journey. If you’re struggling to piece two and two together, feel free to check out this tweetstorm by Lenny Rachitsky (Ex-Growth, Airbnb) who talks about how Booking.com, once a small startup from the Netherlands effectively used performance marketing to find more customers in its early stages.
Once you’ve nailed your offerings, positioning & messaging, it’s time to push the pedal. For this exercise, let’s assume that Weekend Fingers (a cookbook by a leading chef) has run a Facebook Ad offering a discount on groceries at Wallekart (a local chain). It would provide instant value to the customers and then later connect with them through email to buy the cookbook.
However, it often happens that the format in which the information is captured by your Ad campaign may not be similar to the one in your mailing list software. Zapier Formatter is also capable of reading each piece of the information as independent strings (or an array of characters). You can alter them and feed them to any other software in a way that you want.
For Weekend Fingers, we use Facebook Ads to capture the following details.
1. Full Name
2. Email
3. If they are a Wallekart user (Yes/No)
We will then pass on this information to our mailing list software (here, Mailchimp). You can find this zap here.
We will note that the “Name” information captured by Facebook Forms is in the format of “First Name Last Name” or is a single entity. While in Mailchimp first name and last name are separate fields. A Zapier Formatter can easily help us separate the two strings (here First Name & Last Name).

So let’s get cracking! The [TRIGGER] for this zap will be “Every time a new lead is captured” in Facebook Ads. The first step is linking your Fb Ad Account. Once you’ve signed in, link the FB Business page which is running the lead ad (here, Weekend Fingers).

Next, chose the name of the Campaign that is collecting data from your customer. Here, it’s“Free Summer Giveaway”.

Click “Continue” & test your trigger. The latest lead from your ad campaign should be displayed.

Slicing the “First Name”
Now that zapier has access to all lead records, we will set up the first Formatter Zap to separate the first name from the “Name” field in the ad. Let’s name this zap “First Name”. The [ACTION] event for this zap will be “Text” since we are manipulating strings.

In the next step, we will set up the action by providing the necessary details about the splitting.
a. Transform: This is the function (or job) you want to perform on the text value. Choose “Split Text” since we will split the first name and the last name.
b. Input: Fb Ads Field we want to perform the function on. Here, “Full Name”
c. Separator: What should help zapier recognize the split. By default, it’s “space” but you can also type in [: space:].
d. Segment Index: This is a VERY important step since it tells the zap which part of the split string should it generate as output. Since we want to separate the “First Name”, select “First”.

Finally, just hit “Test Run” on the zap. It should return the First name as the Output).
Slicing the “Last Name”
This is fairly straightforward now! Create another zap called “Last Name” and repeat the same process. Just remember to select “Second” in the Segment Index field. This will return the last name as its output.

Finally, let’s connect all the information to Mailchimp. Once you link your Mailchimp account, and the audience where you want to store this information, we can set up the [ACTION] event. Under the “Subscriber Email” field, select the email field received from the ad campaign. Also, don’t forget to select Yes under the “Update Existing” field to prevent any duplication of entries across audiences.
In filling up the First Name and Last Name fields, select the respective formatter zap and the respective output.

We can also pass on other information captured in the ad form to Mailchimp. For eg, here we can share their “Wallekart Subscription” status. This information can be incredibly powerful in retargeting the audience to deliver more tailored messaging/products. (Will only work if a “Wallekart Subscription” field is created in your Mailchimp audience).

Finally, test your zap and see the magic in your Mailchimp audience!
Now that we have conquered the formatter for all our work tasks, we can also use formatter to use for our personal productivity tasks. A few more have been given below.
Building focus
Cannot express the importance of having a focused meeting/session. Constant pings on different channels are highly distracting and may cause you unnecessary frustration. But we got you covered with this zap. It tells your team you’re in a meeting or are busy. You can also customize the message as per your meeting.
Being one with the team
We all have a favorite task management app. If yours is Trello, we’ve got you covered with a zap that lets you create and link your tasks with the team in any other project management app for instance Podio or Asana.
The list is endless!
We no longer need to convince you of the flexibility formatter provides to our data. In case you are still wondering what all functions can you perform on your data, check out this entire list by Zapier. In case the process isn’t as smooth as 007, you can refer to this page to troubleshoot your errors away or just ping us. We’d be happy to help!
So what are you waiting for? Go build :)
Need the help of an automation expert? Contact us now.
This post was written by Rhythm Bhatnagar
Ready to get started?
Tell me what you need and I'll get back to you right away.